How to Host Multiple Websites and Apps on One VPS Using Coolify (n8n, WordPress, Ghost)
Learn how to host unlimited websites, n8n, WordPress, and Ghost on a single VPS using Coolify and Hostinger — for less than $7/month.

In this video, I'm going to show you how you can run unlimited multiple services using just one hosting plan. A lot of times, you know, what you want to do is host multiple services — let's say n8n, a WordPress website, or even your own custom-built app. But for each of them, what we basically do is think of buying a separate hosting plan. Let's say you want to self-host or get multiple WordPress websites — for each one you need a separate hosting plan, right? And if you go and buy those things, it's going to be very expensive because you're going to buy different hosting plans for each service.
So in this video I will show you how you can host everything — all your apps, websites, tools, and even all the open-source projects or any web application — using just one VPS hosting. And I have done that. That is what I'm going to show you. It's really awesome that you can run unlimited multiple services on a single hosting setup.
I'm going to walk you through everything. First we'll set up n8n for automations, then a WordPress website — you can set up multiple WordPress websites if you want — and a Ghost newsletter site for sending newsletters, all using the same VPS. We are going to use a tool called Coolify, which makes this whole process very easy. The hosting plan we'll be using is the VPS hosting plan from Hostinger. The combination of Hostinger VPS and Coolify will help us run multiple apps, services, websites, and even our own web applications — all on one server. That's awesome.
Coolify basically works like a self-hosted platform where you can deploy and manage your services — kind of like a personal Heroku. If you know Heroku, it's a platform developers used to run and deploy their web applications. Coolify is something similar to Heroku or Render, but it is very easy to use. So with just one VPS server you'll be able to run everything from WordPress, n8n, Ghost, or any custom-built application that you want to self-host. That is what I'm going to show you in this video.
Getting the Hostinger VPS Plan
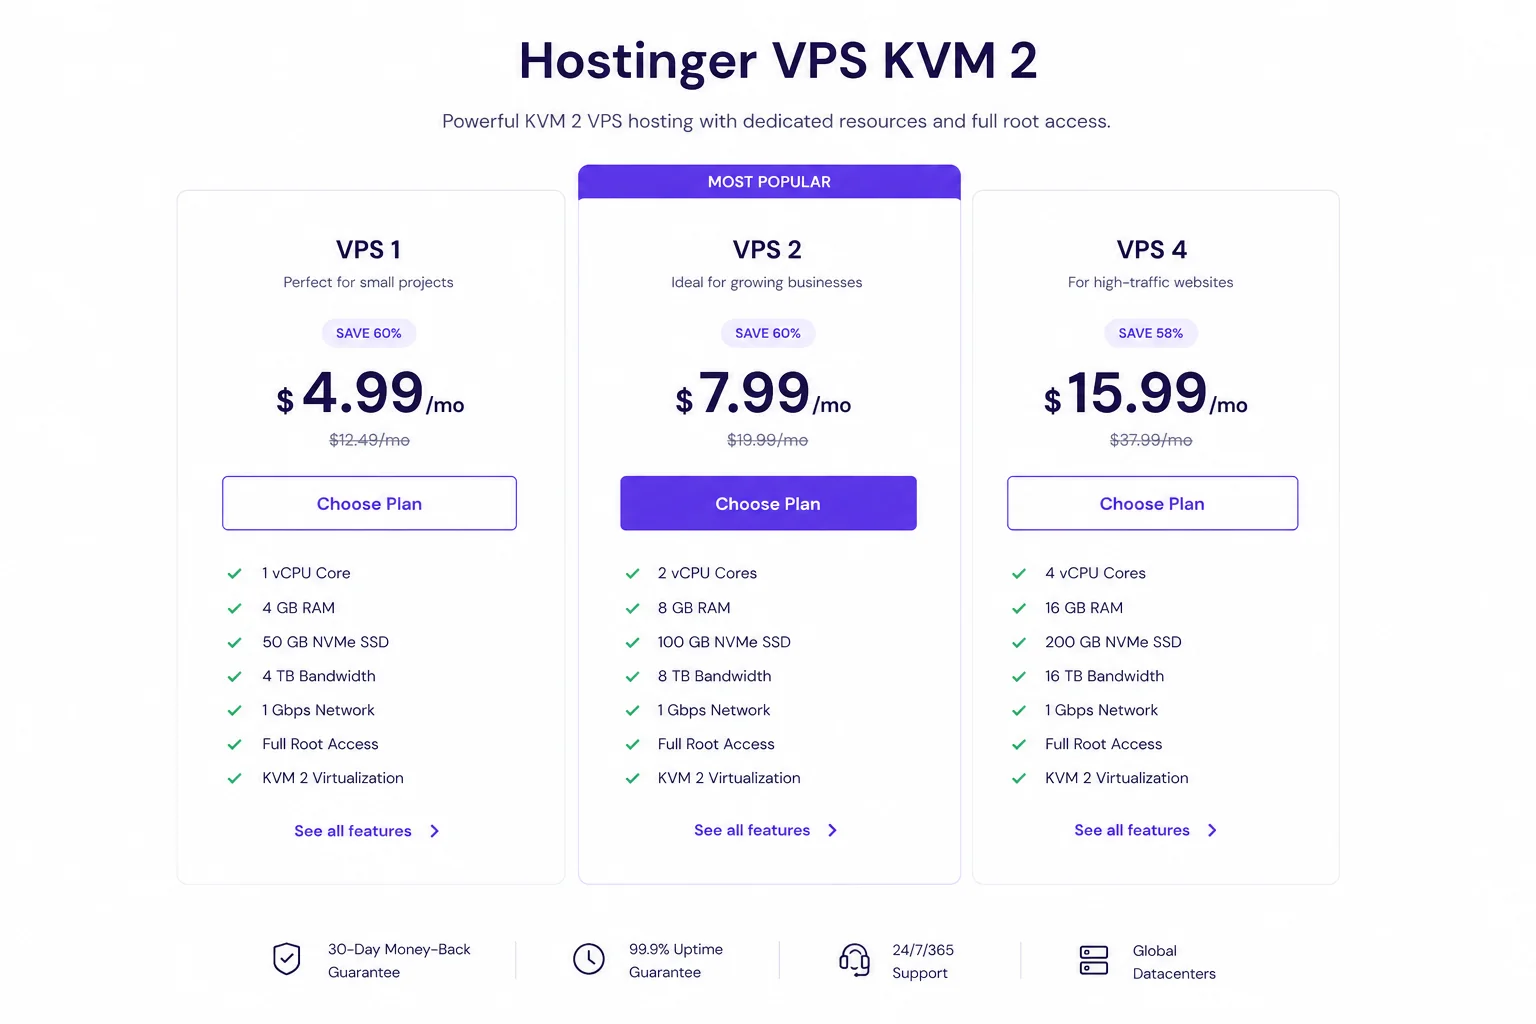
First of all, you need to get a VPS hosting plan. For that, follow the link in the description. When you follow the link, you'll come to the Hostinger VPS page. Go with the KVM2 plan, which is $6.99 per month on the 24-month plan. It's the best one — I also use this plan for VPS hosting. Just select this plan from Hostinger.
Once you have selected it, you will see that it is for 24 months. If you reduce the number of months, the cost will increase. For example, if you go for 12 months it will be $8.14 per month, and if you choose one month it will be $9.99 — almost $10 every month. So I recommend going with the 24-month option because you get the best value for the price.
There's also an option for daily auto backup, but that's not important. You can set up backup manually later on, or you can use n8n for auto backup. If you have any coupon code, you can apply it there for some discounts. You can also change your server location depending on where you are. I'll go with India because I'm located here. You can also choose US or some other country depending on your target audience location.
Next, you need to select the operating system. This is really important. You'll search for Coolify, select it, and then click on confirm. After that, click continue. It will ask you to log in. If you don't have an account yet on Hostinger, just create a new one. Once you have created your account, you'll be asked to create your password — this will be the password for your VPS. After that, you will land on your VPS dashboard. It might take some time to load, but once everything is done you will see an overview of your server.
Setting Up Coolify
Once your Coolify instance is ready, it's time to access it. What you will do now is click on the manage panel — it will open Coolify in a new browser. You will see that on the top corner it shows "not secure." Don't worry about that. Once we create our Coolify account, we can secure it by adding our custom domain and Coolify will enable an SSL certificate, which will definitely make it secure.
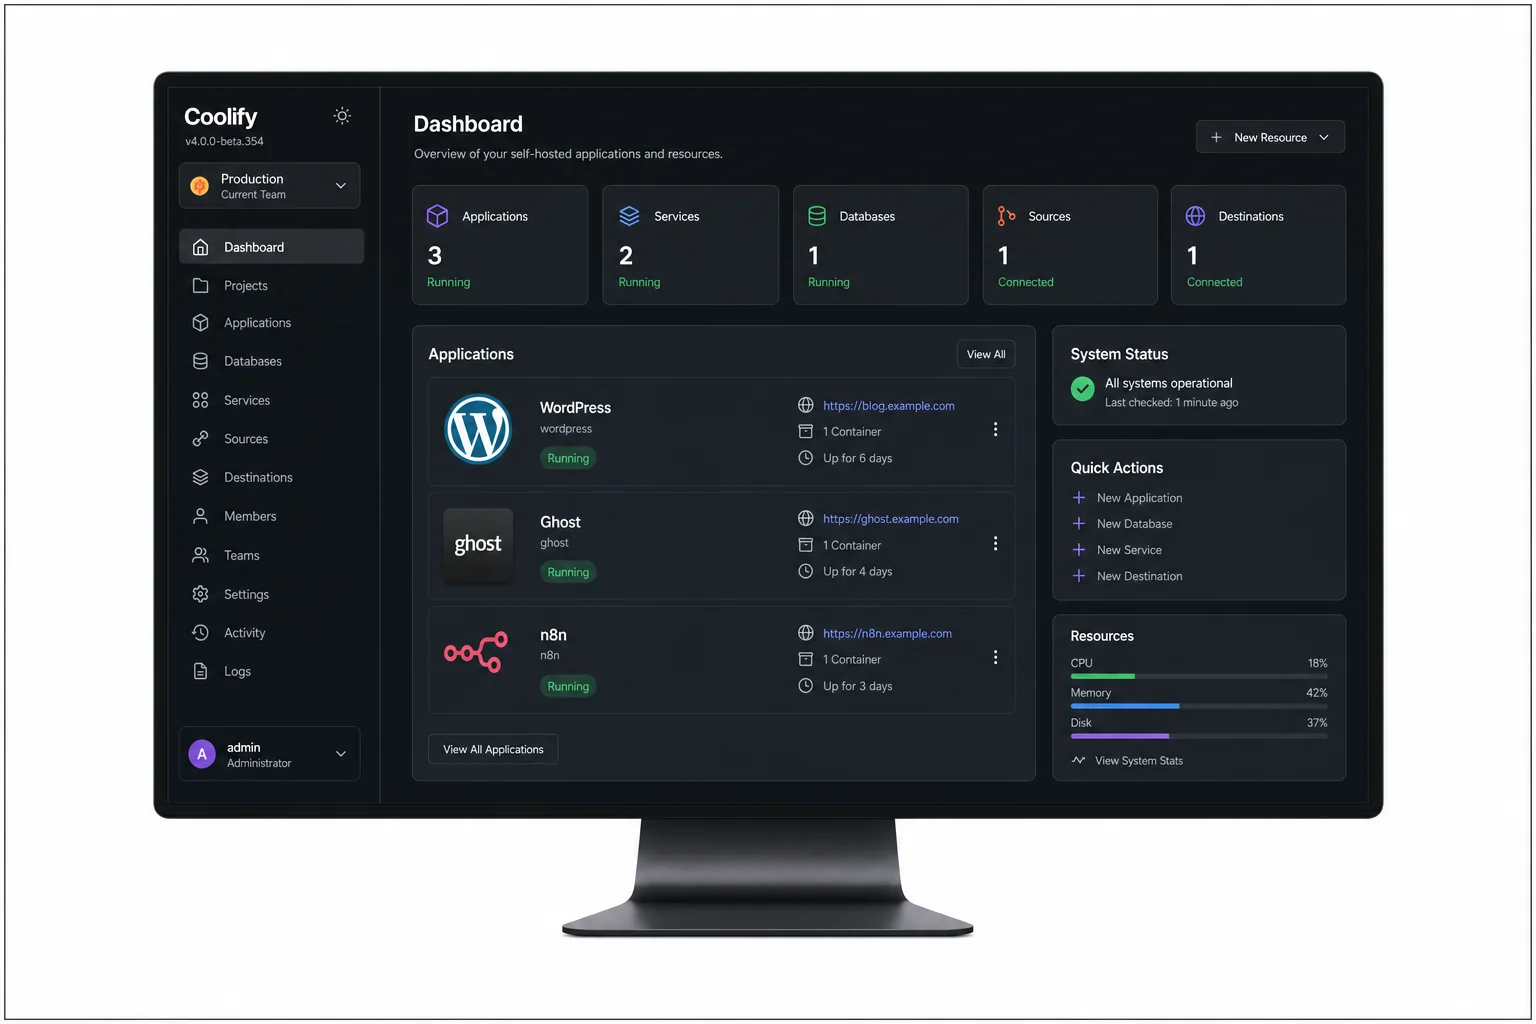
So now let's get started by creating an account on Coolify. Just type your name, enter your email address, set the password, and then click on register. Once your account is created, click on get started. You can skip the onboarding and it takes you straight to the dashboard. Inside the dashboard, you can see that there is a server showing as localhost.
Now from the dashboard, simply go to settings. Once inside settings, just enter your domain name. For example, you can enter something like https://coolify.yourdomain.com. Let's say you have your own domain like example.com — in that case, you just need to add the subdomain part, whatever you want to use. You can also add the full domain, no problem at all. Basically, if you have any existing domain that's not already connected to any website or service, you can paste that domain here. Even if it is connected, no worries — you can just add a subdomain, for example "coolify", to identify the service easily. After entering the subdomain name, click on save.
Configuring Domain and DNS
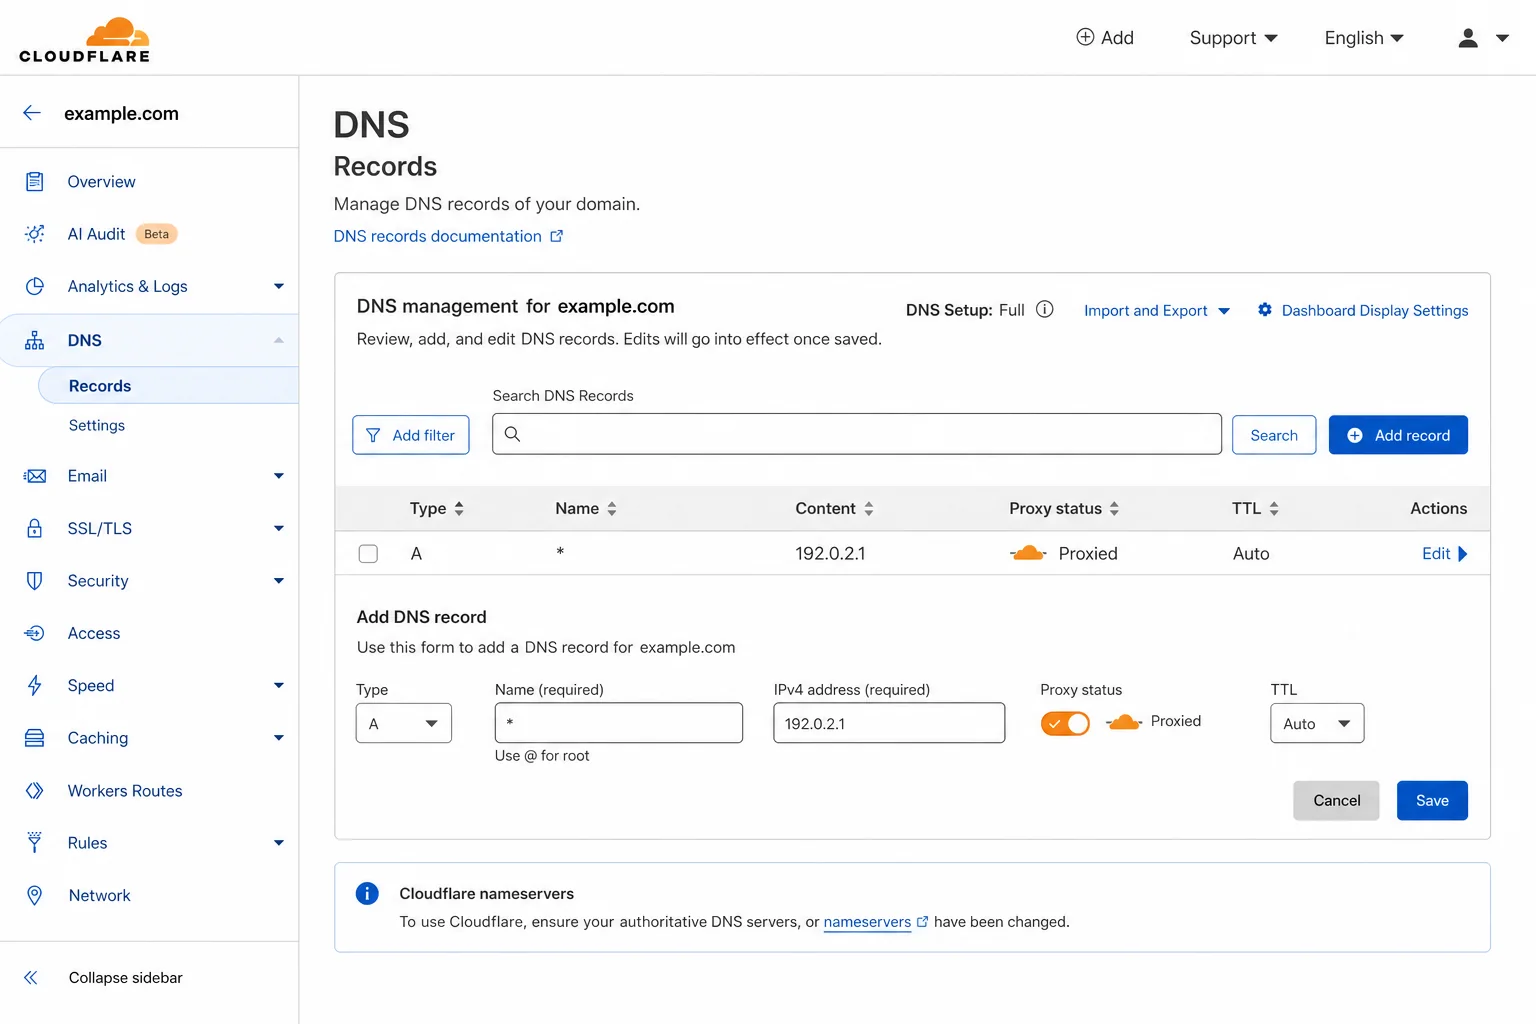
To add your domain in Coolify, you need to first get the IP address of your VPS server. You can copy the IP address either directly from your hosting dashboard under root access, or directly from Coolify. Once you have the IP address, go to your DNS provider — the place where your domain is managed. Go to the DNS record section, open your domain, and create an A record. In the hostname field, enter the subdomain you used (in this case, "coolify"). In the value or "points to" field, paste the IP address of your server. TTL can stay as default. Then just click create. Once it is created, you can go back to Coolify and click save.
There is one more step left — otherwise our domain won't properly point to the server. We also need to add another A record, this time for the main domain, not just the subdomain. In the hostname field, you can simply add @ or keep it empty — this represents the root domain. Then in the IP field, paste the same IP address. Click create record. Once that is done, your domain will be pointed to the VPS service IP address. Now everything you create under this domain will work properly.
For example, if you want to host a WordPress site, you can just add a subdomain like wordpress.yourdomain.com or blog.yourdomain.com, or directly use yourdomain.com and it will point correctly.
After some time, open Coolify using the subdomain you pointed it to. As you can see it opens, there's a valid SSL certificate added — the site is secure now. After logging in, you are now inside the Coolify dashboard. From here, you can start creating projects and adding the services you want — like n8n, WordPress, Ghost, or any other service. You can host multiple n8n sites, multiple WordPress websites, or any web application, whether it's built with Node.js, Python, or anything else. And the best part is you're doing all of this with just one VPS server. If you're looking to build more automation systems, check out The New n8n MCP Update: Automate and Build Full Apps with AI for ideas on what you can run.
As I mentioned before, with just one hosting setup you can run unlimited multiple services. But "unlimited" is a bit exaggerated — you do have some limitation because your VPS will be overloaded if you add too many services. You can always change the plan for your VPS if it gets stuck.
Adding Cloudflare for Extra Security
Now, especially if you are planning to host WordPress websites, n8n, or any web application or content platform, you need to make sure that your domain DNS is well protected and your Coolify instance is well protected. For that, you'll use Cloudflare. All you have to do is transfer your domain DNS records to Cloudflare. It's very simple — just change the nameserver in your domain settings. No matter where your domain is registered, it could be Namecheap, GoDaddy, or any other provider, just replace their nameserver with the ones Cloudflare gives you. Once that is done, your DNS records will be managed by Cloudflare. If you don't know how to do that, you can find tons of tutorials on YouTube — it's really, really easy.
After transferring, you will see all your DNS records inside Cloudflare. Inside Cloudflare under DNS records, you need to add a new record using the asterisk (*) symbol, which is basically a wildcard. This means it will cover all the subdomains. The moment you put that star or asterisk symbol, it means it covers all the subdomains you create under this domain. Paste the server IP address in the value field and save. As you create any subdomain inside Coolify, it will automatically direct to the correct IP address because of this wildcard DNS record. This means you can create any subdomain and it will work without issues — you don't have to add a DNS record every time.
Also inside Cloudflare, go to SSL and TLS, and under overview, make sure the encryption mode is set to Full. This is really important because it shows that your website is secured with HTTPS. Next, go to the edge certificate tab, scroll down, and make sure to enable Always Use HTTPS. What it does is force every connection through HTTPS, adding an extra layer of security. Coolify already provides an SSL certificate, but this makes everything stay encrypted and secure. This is exactly how managed web hosting works — they give you one IP and allow you to host multiple websites on it. We are doing the same thing here but using Coolify.
Installing Services: n8n, WordPress, and Ghost
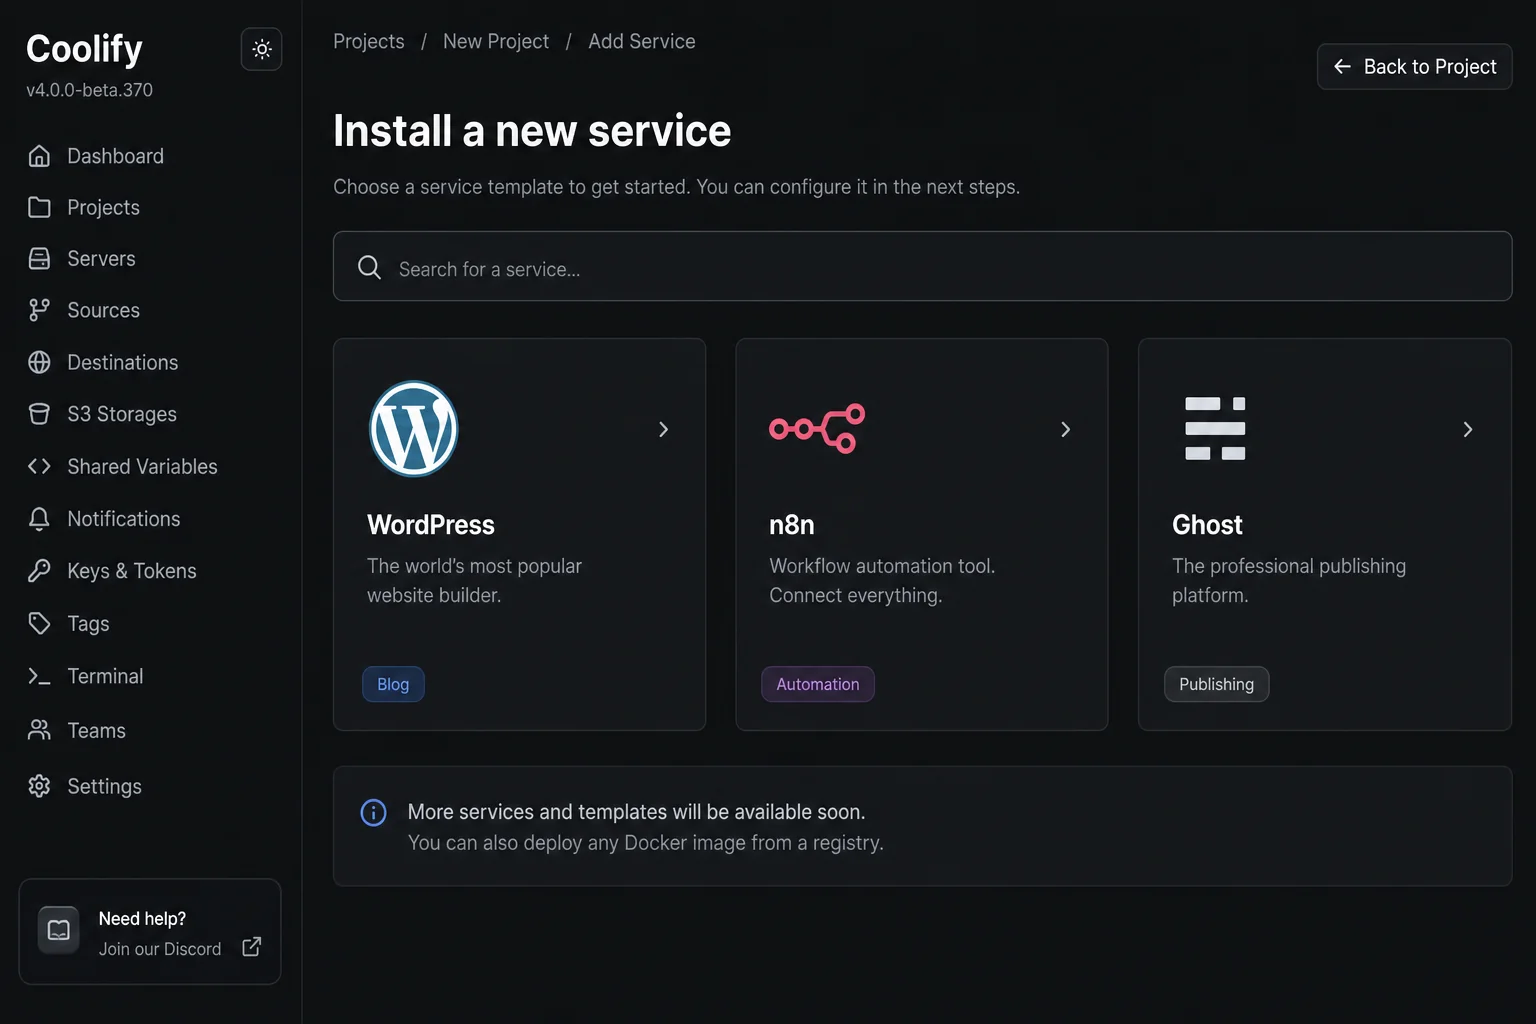
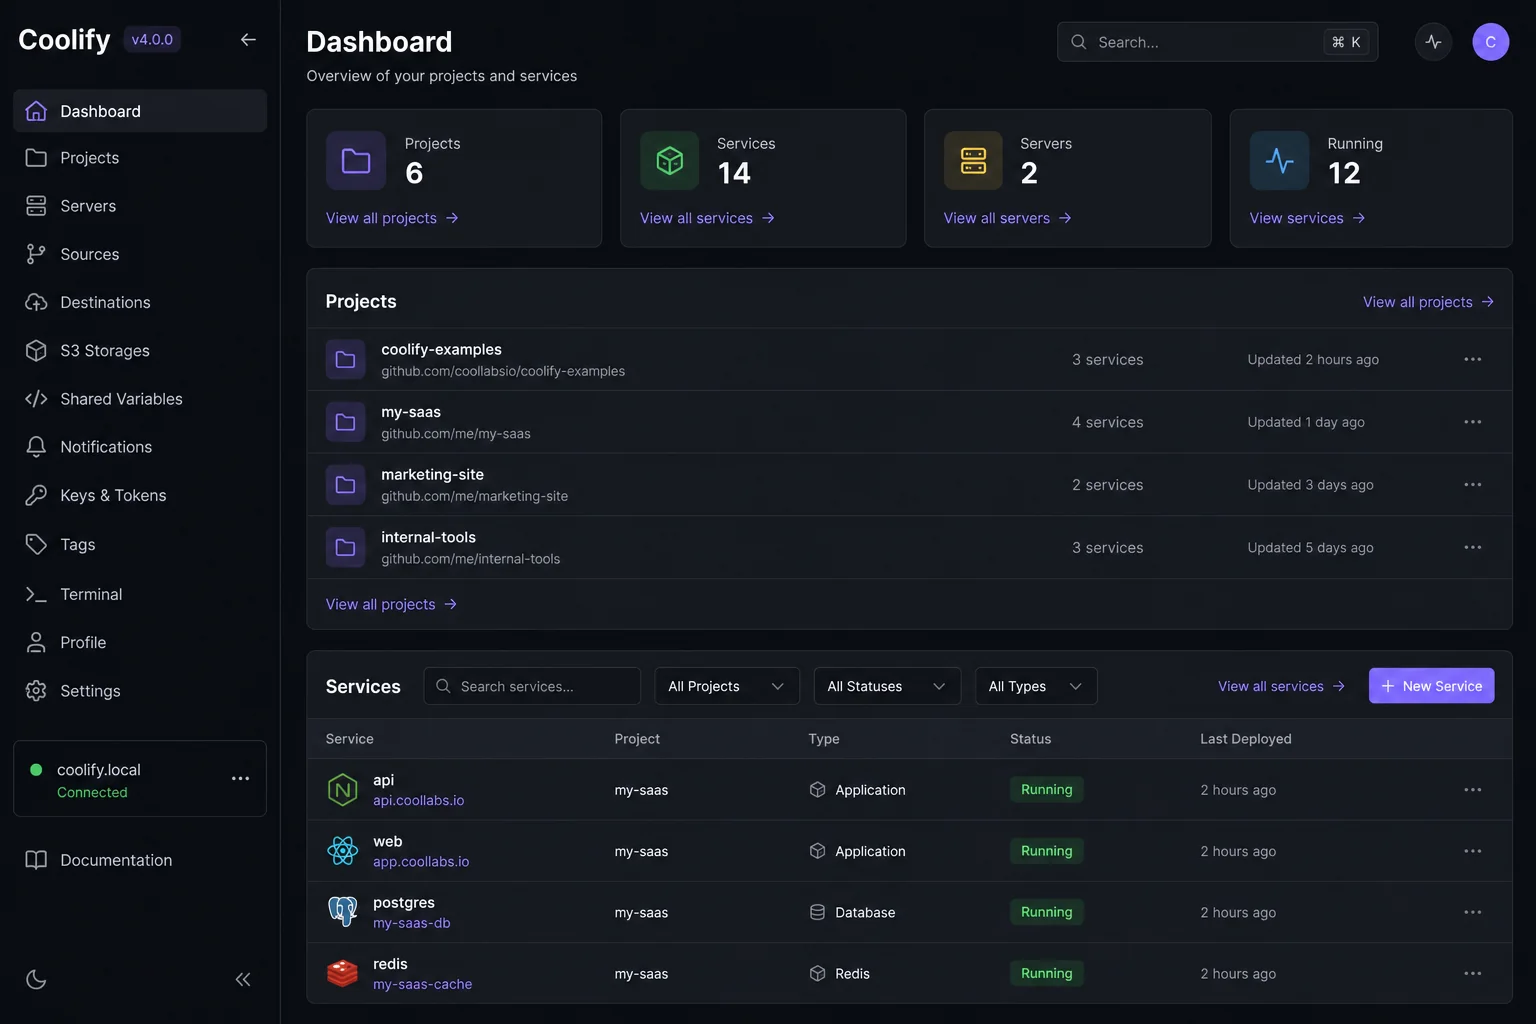
Now let's go back to Coolify and install some services. First, go to projects, open the projects section, and click on add a project. You can name it something like "websites" or "automation" or "web application." I'll just name it "website" since it's more general. Then click continue. After that, go to the production section and click on add a new resource.
Here you will search for the service you want to install. Let's say you want to install n8n. You'll see options like n8n with PostgreSQL or just n8n alone. Go with the standalone n8n. Before deploying, go to the service section. Under services, you'll see the domain name area — click on the edit icon and enter a subdomain like https://n8n.yourdomain.com. Once you've entered that, click save and then deploy. It's going to take some time to set up the service. Once the container has started running, you'll get confirmation that the service started successfully. Then go to the links section and open it — n8n will open in a new tab. You can create an account and using some template just start creating workflows. That's the first service installed. If you want to run more automation workflows, check out how others are using these self-hosted tools in 6 AI Businesses You Can Start This Week.
Now let's say you want to install WordPress — but this time on your main domain directly, like yourdomain.com, instead of a subdomain. Go back to the dashboard, then go to the projects section, open the existing one called "websites," and click on add resource. Search for WordPress — you'll see "WordPress with MariaDB." That's the one you have to select. Scroll down to the domain section and click edit, entering the domain as https://yourdomain.com. Click save, then click deploy to start the installation. Once it's finished, click on links and open it — your WordPress site is now ready to launch. You can go through the WordPress setup, set your site title, create a username, set a password, enter your email address, and click install WordPress. Just like that, WordPress will be installed and you can start publishing posts.
Now let's say you want to install Ghost. Go back to Coolify, then to projects. Whether it's a Ghost website or any other service, you'll find a lot of resources available here. If you scroll down, you'll also see an option to install Docker, so you can run Docker images as well. There are many pre-built services you can install and many of them are easy to set up. In one of my previous videos, I talked about how I'm running a Ghost website using Ghost hosting, which costs me $18 per year on just the starter plan — and I'm not even getting all the features. But here in this setup, you are going to get everything absolutely for free — even the premium features — all in one place. And on top of that, you can create multiple Ghost newsletter platforms. Search for Ghost inside the add resource section, click on it, add a subdomain like blog.yourdomain.com, click save, then click deploy. Ghost will start installing. These are all open-source projects that can be hosted easily with just one VPS server. You can also run self-hosted AI agents and other tools — see how others are doing this in 8 AI Agents That Can Replace Your Entire Agency Staff in 2026.
Updating Services in Coolify
Now what is the most important thing — how do you update any service in Coolify? Because every service needs updates from time to time, whether it's WordPress, Ghost, or any other service. There is a very simple way to update services inside Coolify.
Let's say WordPress has an update available and you want to update it. If you are using managed web hosting, updates happen automatically — you get a notification inside WordPress and just click update. But since we are doing self-hosting using Coolify, we need to handle updates ourselves. We will open our projects and go to where WordPress is installed. By the way, you can also rename your services. For example, mine shows something like "WordPress with MariaDB" and some code beside it — I can just rename it "WordPress" to keep it clean and simple.
To update WordPress in Coolify, open the WordPress service. Then you'll need to stop the container. Once it stopped, you can redeploy it. But before you redeploy, it is very, very important to make sure that your data is saved properly. Make sure the database and all your WordPress files are backed up so nothing gets lost when you redeploy.
Coolify has something called persistent storage, which automatically handles this. If you go to the persistent storage section, you will see the volume name and the destination path — this confirms that your WordPress data is saved on your VPS server. But to confirm that it is saving on the server, you can use the terminal. Go to your hosting or VPS server dashboard and open the terminal — it actually connects via SSH. Once the terminal is open, run the command docker volume ls. You will see the volume names listed — the volume that contains the WordPress files will be there, matching exactly what you saw in Coolify, along with the MariaDB volume.
Next, to check inside the WordPress volume to see if actual files like posts, pages, settings, and other data are present, run the next command. After running it, you will see all the WordPress files listed — WP settings, WP comments, WP config, WP login, and many others. That confirms all the data is saved and stored in the VPS.
Backing Up WordPress with UpdraftPlus

For better updates — especially if you don't want the risk of losing data, posts, images, or media — you can install a backup plugin inside WordPress. Go to your WordPress website, head over to the dashboard, and go to the plugin section. Click add new plugin and search for UpdraftPlus. You'll see "UpdraftPlus WordPress Backup Plugin" — that's the one you want. Install it and activate it.
This plugin can automatically back up everything you do inside your WordPress site. You can even export the backups and save them to services like Google Drive, Dropbox, Amazon S3, or even Google Cloud. Go to the plugin settings and click on backup now to start the backup process manually. Even though this step is not always necessary, I still recommend doing it, especially if you have a plan to move your site or make changes — it gives you a solid backup just in case.
Once the initial backup is done, you'll also want to set up automatic daily backups. Go to the settings in UpdraftPlus and under file backup schedule and database backup schedule, change them from manual to daily. This makes sure that your backups are created automatically every day without you needing to do anything. Next, choose your remote storage. You can connect Google Drive, Dropbox, or even S3. I'm going to use Google Drive — just click on Google Drive, sign in with your Google account to give permission, and once it's connected everything will be saved there securely. After that, scroll down and click save changes — and you're done. That works great and should be enough for most users. The free version of the plugin is all you need.
Now once everything is backed up, let's say you want to upgrade WordPress itself to a new version. Go back to Coolify, open your WordPress service section, and simply stop the container. After stopping it, you'll be able to deploy with the latest version — just click deploy. Once it has started, click on links and open it. You can see that all the posts are still there. Go back to the dashboard — all the plugins are still there, everything is there, the pages, the posts, your username, all the other information. Nothing got deleted. Everything is safe. Even if you don't have the UpdraftPlus plugin installed, everything will still be saved because of the persistent storage we confirmed through those SSH commands earlier. For more on building systems that protect and scale your online presence, check out Free Open-Source WhatsApp CRM: Full Setup Guide for another example of self-hosted tools that save you money.
Scaling Further with Additional Servers
That's it — this is how you can run multiple services on a single hosting using Coolify. You can create multiple projects, host your own servers, and manage everything in one place. If you want to scale further and host even more services, you can add additional servers too. Let's say you get another VPS or another hosting provider — you can just connect it by adding the new server's IP address inside Coolify. All you need to do is add the token, host, and then you can start deploying more services independently to that server.
That becomes a permanent solution for hosting all your services. You don't need anything else. And the Hostinger KVM2 VPS plan at $6.99 per month is the best starting point for this setup. I hope you find this video helpful. If you have any questions or need any information, feel free to ask — and also check the link in the description.