How to Build Income-Generating Web Apps with AI: Complete Tutorial

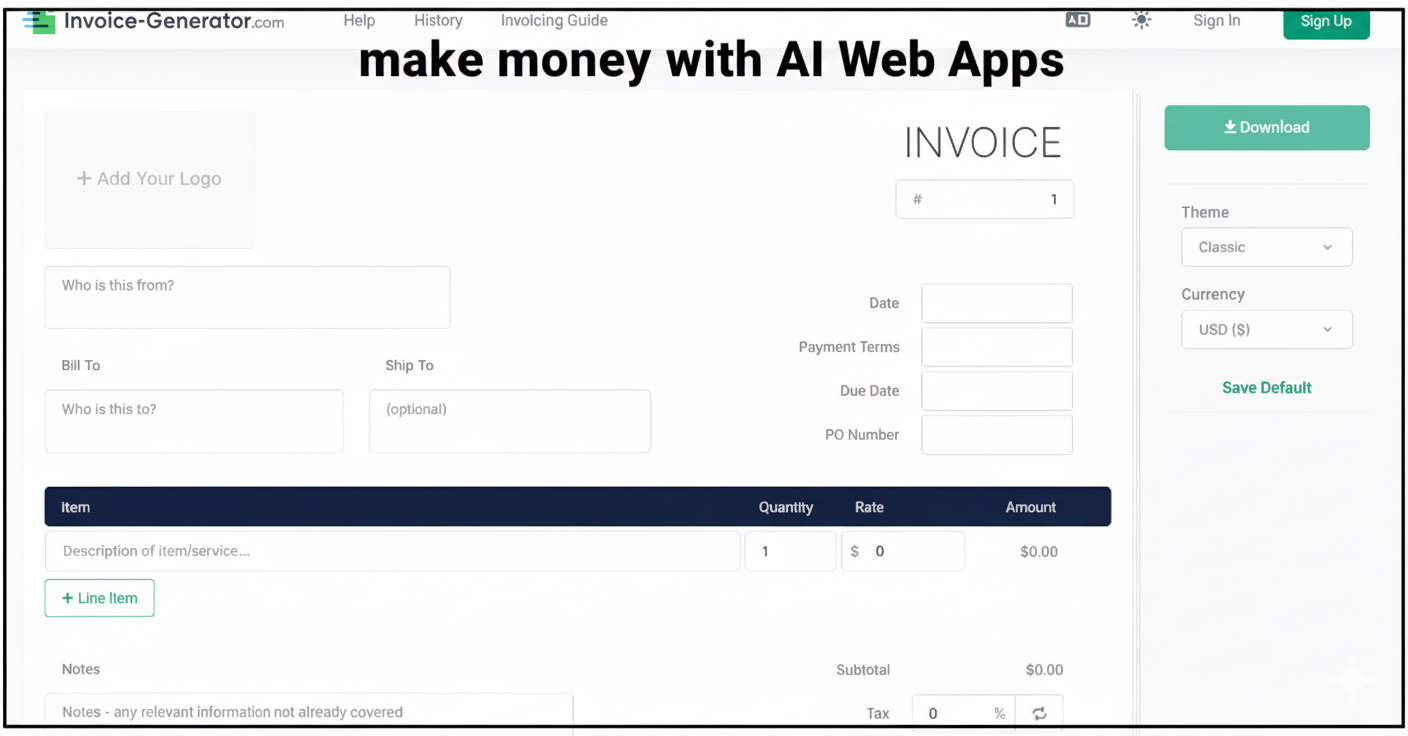
This right here is a simple web app that allows users to generate invoices. With about two million visitors per month, an average of 4.2 pages per visit, three ads per page, and a conservative ad revenue of $1 per 1,000 visitors, we know that this simple invoice generator is pulling in at least $25,000 per month.
And it's just one of many examples of simple web apps making thousands of dollars per month in passive income. Up until now, building and launching these web apps used to require specific skills, like coding or UX design. But what if I told you that you can now actually build your own income-generating web app in just minutes without needing any of these specific skills?
It's all possible with a new AI tool called Hostinger Horizons. It lets you go from idea to a functioning web app in just a few minutes without ever having to write a single line of code.
Now, I'm gonna show you exactly how this works step by step. First, we'll write a prompt and generate the first version of our app. Then we'll customize its functionality, add Google AdSense for revenue, connect the database for user management, and finally, I'll share some tips on how to optimize the app for search engines to attract visitors.
Generate a Web App
Let's start by setting up a Hostinger Horizons account. Normally it's less than $7 per month to get started, but if you use our special signup link in the description below, you'll get an additional 10% off your plan, so be sure to use that link to save some money.
There are four different plans and really the only difference between them is how many message credits you get, so I recommend the Starter plan. It will get you 70 messages per month and it's super easy to scale up if you run out and need more later.
Pick your plan. Then on the next page, make sure to select a term of 12 months to get a free domain and hosting for your app. Then continue to the next page, enter your email and create a password. Then add your billing address and your payment information to complete your order.
Next, you land on this page. Here you can create your web app by simply typing a description about what you want it to be. This is your chance to think and dream big. Describe your app in as much detail as you can come up with, including your name, style, and any features you want it to have.
In my case, I'm building an invoice generator called InvoSnap, so I've written up a brief description of how I want it to function, how I want it to look, and then when we're ready, we can click the purple Send button.
You may get a popup like this prompting you to invite friends. Go ahead and just exit out of that. Here we can see Hostinger Horizons is hard at work. It is actively coding, and you can see this loading screen that'll provide you with some really good tips for prompting. The initial build can take a few minutes, so just sit back, grab a coffee, and let it work.
Test What Hostinger Horizons Built
In just a few seconds, Hostinger Horizons has built out a full app, the elements, the design and the function all based on just one prompt, but does it really work? Let's test out some of the features that were generated.
I'll go ahead and fill out some generic information for this invoice. I filled out all the fields and you can see this live preview of the invoice here down at the bottom of the page. So let's go ahead and click the download PDF button and see if it really works.
Sure enough, it looks like the invoice is showing up in PDF format beautifully, but I don't really like the generic logo in the top right, so we'll wanna fix that later.
Let's check and see if this dark mode, light mode switch works. Ooh, I really like that, but the dark invoice is a bit weird. We'd probably still want to download an invoice with a regular white background, so let's note that too.
Next, let's check the mobile layout. You can check the mobile layout by clicking the phone icon on the top right. And here we can see that the invoice gets a little squished on the right side, but overall looks pretty good. Scrolling up, I noticed that the elements in the header look a bit squished, so we'll wanna fix that too.
Finally, if you wanna check out your app in a standalone window, you can click this little box with an arrow to pop it out to a new tab. This honestly looks pretty nice in this format.
How to Prompt & Customize
Now that we've tested what works and what doesn't, it's time to take control, so how exactly do you tell Hostinger Horizons what to fix? In this section, I'll show you how to guide Hostinger Horizons step-by-step to update your app's features, logic and design without breaking anything in the process. Plus, I'll share a few crucial tricks I wish I knew the first time I built a web app with this tool.
First, let's close out of this preview tab and go back to Hostinger Horizons. You'll notice in this view, we can't see that live invoice preview window anymore, and I think this is a browser zoom issue, so I'll zoom out just a little bit, and there we go, the live preview appears.
Next, I wanna change the logo that appears on the invoice. Right now it's this generic M. I wanna make it so users can upload their own logo and if they don't, nothing appears in that logo spot on the invoice.
To make this change, we can simply type that request in the chat box in the bottom left. The key with prompting in Hostinger Horizons is to be as concise and specific as possible with your requests, and generally you only want to request one change at a time, otherwise the AI can get a bit confused and the AI might not do exactly what you're asking for.
So here I'll type up a simple prompt. I've said instead of a generic logo that appears in the upper right of the invoice, let's allow users to upload their own logo, and if they don't upload their own logo, nothing should appear in that upper right invoice position. Just leave it completely blank.
Now that we've entered a prompt, let's hit send. And just like with the initial generation, Hostinger Horizons will take a little bit of time to process the request. You'll see some code being written in the background and some notes in the left side chat to let you know what it's doing.
To save time, I'll go ahead and fast forward. And just like that, the AI has made the change and that upper right section of the invoice is blank, but if we want, we can click to upload a logo.
Mobile Layout Improvements
Next, let's work on that mobile layout. In the upper right, we'll click the mobile view button and then what stands out to me the most is how cramped this header looks.
To show the AI exactly what we want changed, we can take a screenshot and upload it to the chat. On a Mac, you can click Command + Shift + 4, and then this cursor appears where you can click and drag to highlight exactly what you want to screenshot. Let it go, I get a screenshot and I'll drag it into the message field.
Then I'll type a simple prompt to go along with it. I've said, "In mobile view, the header is cramped. Please clean up and simplify the header layout on small screens." Then I'll click send.
Let's fast forward to see the results. Here you can see it changed the layout so things are less cramped, but I'm not totally happy with this yet. I think it would look a lot better if we didn't show the professional invoice generator tagline in this view so that we could fit everything in one line.
So I'll simply tell that to the AI in the chat. Then we'll submit the request. There we go. That's looking a lot more professional. Let's click back to desktop view.
Saving Message Credits
Now, every time you send a message to the AI, it uses one message credit and you can check to see how many message credits you have left at any given time by clicking in the hamburger menu at the top left.
There are a few ways to save message credits so you don't have to message the AI for absolutely every small change. One of the simplest ways to save credits is to make simple changes by using the edit content view. You can get there by clicking that tab in the top middle of the preview.
In the edit content view, you'll see boxes appear around the elements that you are able to adjust manually. For example, for SEO purposes, maybe I want this to actually be called a free professional invoice generator. So we can click on this tagline in the top and then a text editor will appear. I'll click into the text editor and add the word free and then click save and then Hostinger Horizons will process the change and it won't cost any message credits.
If you know how to code, you can also use the code tab at the top to see the raw code for the website. You can click through the various files that make up the website on the left side and then make changes to the app by typing directly in the code as you would in any code editor. To keep things simple, we'll skip this today and go back to the preview tab.
Undoing Changes
Now, what happens when the AI makes changes that you don't want or you don't like the changes you've requested? For example, I went a little crazy here and wanted to see what it would look like if the invoice was bright blue. I regret that choice now, so how do we undo this?
There's two ways you can undo changes you don't like. The first way is to go back to the chat on the left side and click the undo button to undo any changes you've made, or if you've made several changes over the course of a few messages and you don't like them, you can always revert back to the version that you do like by scrolling to that version in the chat and clicking Restore.
So I'll go ahead and do that method now. You'll get a note here saying All changes made to your project after this message will be permanently deleted. Do you want to continue? So we'll go ahead and click Restore to confirm that we want to roll back. And just like that, we've got our white background invoice back. Much better.
Launch the Web App
Now our web app is working nicely, but only we can use it. Nobody else can see it yet. Next, I'll show how to get a free domain and take the web app live.
Publishing is really straightforward. Simply go up to the top right and click the Publish button to make your web app public. When it's done, you'll get a confirmation message like this and then you can click view site to see your site at the temporary domain.
There it is. Beautiful. But this temporary domain's kind of ugly and not very memorable, so let's personalize it. We'll close this tab and go back to Horizons. Then close out the confirmation message.
Next, let's go back to the Hostinger dashboard. We can do this by clicking the hamburger menu in the top left and then clicking Hostinger dashboard. When you land on the Hostinger dashboard, if you're not already there, make sure to select Horizons from the navigation on the left side.
Then find your site with your temporary domain and click connect domain. Here you can search for a domain to use. I generally recommend using a .com if it's available. So let's see what we can find for InvoSnap.
InvoSnap.com is not available, so let's try adding a dash. And there we go. Invo-snap.com is available and free for one year. We'll go ahead and click it to select it. Then in the bottom right, we'll click next.
You'll be prompted to register your domain. Go ahead and follow the steps to enter your contact information. When you're done, you should get a confirmation saying the domain was added to your site.
Now, to make sure that your new web app actually goes online at this domain and stays online, you'll need to verify your email address. Go to your inbox and find the message from Hostinger. This is what the email will look like in your inbox. Go ahead and click Verify Email.
Then you'll get a confirmation message like this. Click the Continue to Home button. Nice, we can close out of this tab and the mail and click Continue on the original tab. And back on the Horizons page of our dashboard, we can see that our web app is linked to invo-snap.com and you can see the live site by clicking on this square with an arrow in it.
There it is.
Add Monetization with Google AdSense
So now your web app is live on the internet, ready for people to use, but how do we turn this web app into something that can actually make money? Next, I'll show you how to monetize your web app by connecting Google AdSense with just a few clicks and a simple prompt.
In a new tab, go to adsense.google.com. I've left a link to it in the description below. Next, sign up or sign in. After that, you'll be routed to an onboarding flow. Enter your site's URL. In our case, that's invo-snap.com. Then complete the rest of the form with your information.
Finally, click start using AdSense. Next, you'll land on the AdSense dashboard. There are three main steps here to get your website connected. Let's start with the first, entering payment information. Click the enter information button on the left. Then complete the form.
After completing that form, under the center Ads block, click explore to see how ads look on your site. Google will prepare a preview so you can check how ads will appear and when it's finished, it'll load the mobile view of your site. You'll also see this red button up top that says Get code. Go ahead and click that.
You'll get this popup that tells you to copy and paste the AdSense code in between the head tags of your site. So here's what we're gonna do. Click the copy button, return to Hostinger Horizons, and then type this prompt in the message field.
Enter the following Google AdSense code between the head tags of every page of this website. Then hold Shift and click Enter or Return a couple of times to create some space and paste in the code from Google AdSense. Then click Send.
There won't be any visible changes to your site, but Hostinger Horizons has added this Google AdSense snippet in the background. Once it's processed the change, go ahead and publish it using the button in the top right.
When it's published, go ahead and close out the confirmation window. Then return to the Google AdSense tab and close out the pop-up. Next, click the Refresh button to the left of your domain. If Hostinger Horizons successfully installed the code, after a refresh, you should see your app appear and that Get Code button will have disappeared.
Setting Up Auto Ads
Next, let's turn on auto ads so Google can automatically optimize where to place ads on your site. On the right side, click the toggle next to auto ads. Then you'll see some preview Google ads appear in your app. Scroll through and check out how it looks.
If you see any ad previews in locations that would be disruptive to the flow of your app, you can click the not allowed sign to exclude ads from that area of your app. Clicking that will open the excluded areas settings on the right side, and you'll see these blue bars appear throughout your site.
You can hover over any blue bar and then click to exclude that area from automatic ad placement. Check out your mobile and desktop previews and exclude ads from any areas that would be disruptive for your users. When you're all done, in the bottom right, click apply to site, then click save.
Site Verification
Finally, let's connect your site to AdSense. Click the Let's Go button in the final box. The first section in this final step is to verify site ownership, and by default, the AdSense code snippet method is selected. This is the code snippet we've already placed, so go ahead and click the checkbox saying I've placed this code. Then click Verify.
If you get this couldn't verify your site popup, you have a couple of options to fix it. The first option you can try is to tell Hostinger Horizons that the Google AdSense crawler can't find the code, and to make sure that it's accessible.
We'll go back to Hostinger Horizons and tell it about the problem. Once you type the message in, click Send. After the AI processes this change request, go ahead and click publish in the top right to push these changes to the live website. Then return to Google AdSense, click OK to close this dialogue and then click Verify again.
And just like that, our site is verified, so we can click Next. If for some reason that last method didn't work, the next best method is to try adding a meta tag. Check the meta tag option under verify site ownership, and then copy the code that's provided. Give it to Hostinger in the exact same way we provided the last block of code, but in our case, method one worked so we'll continue on.
Simply click request review at the bottom of the page. You'll be prompted to create a consent message for your sites. This is to ensure that your site adheres to various governmental regulations. So pick one of the first two options and then click submit.
When you're all done, click the X on the top left to exit this window. Then back on the Google AdSense dashboard, click sites in the left navigation, and here you'll see the current approval status of your site.
Getting approval for Google AdSense can take a couple of days, so you'll wanna check back on this later. They'll email you with any status updates and if they need any changes, they'll let you know. Otherwise, Google Ads are all set to go.
Connect a Database to Handle User Data
Okay, so far we've been focused on updating the web app functions, style and monetization, but right now all of your user's data lives only in the browser. If someone refreshes the page, it's gone. This is where Supabase comes in. With just a few prompts, you'll add a real database so users can log in to save their data and your web app becomes something people can rely on.
Close out of the Google AdSense tab and return to Hostinger Horizons. In the top right, click integrations. Then click Supabase and click Connect. You'll get a popup window that prompts you to log in, but if you don't have an account yet, scroll down and click Sign Up Now. Then enter your email and create a password and click Sign Up.
Next, you'll need to check your email and confirm your account. This is what the confirmation email looks like. Click the confirm email address button. You'll be routed to this page on Supabase, which asks you for permissions to authorize the API. Go ahead and scroll down and click Create an organization.
Then give your organization a name. You can select an organization type. I'll leave it at personal, and then you can select a pricing plan. You can start on the free plan with no problem, so go ahead and just click Create Organization. And then scroll down to the bottom of the page and click Authorize Hostinger Horizons.
Then you'll be routed back to Hostinger Horizons, and in the right side, it'll say Connect Supabase project. Under your newly created organization, click Create New Project. Select your organization, give the project a name. In our case, we'll name it after the app. And then create a database password.
Select the region that's closest to your intended users. In my case, East US is just fine, and then click Create new project. Next, you'll be routed to a page that shows that Supabase is setting up the project. Give it just a few minutes to process.
Then you'll get a page that says, welcome to your new project, and eventually the project status in the top right will change to green. Return to Hostinger Horizons, and then next to your organization, click Refresh. After refreshing, the new project appears. Go ahead and click Connect and then click Connect again.
Now automatically in the background, Hostinger Horizon's AI will connect your app to Supabase. You can see in the left side message that it's adding the necessary package to the project, creating a table in Supabase to store invoice data and setting up authentication to manage users.
Testing User Authentication
Now when the web app reloads, you can see that there's some new features that have been added. Here at the top right we have a user plus icon, so let's click that and see what it did. It looks like it brings up a Create Account dialogue or at the bottom you can click Sign In. So let's go ahead and create an account to make sure it works.
We got a little Toast message pop up in the bottom right that's saying we need to confirm our account. This happens any time Hostinger Horizons connects a new Supabase instance to manage authentication.
So let's go back to our Supabase tab, and then on the left side menu, go down to authentication, and here you can see that the new user has been added, and if we scroll to the right, we can see that it's still waiting for verification.
Now, to make sure that verification works properly, on the left side, go to URL configuration and then change the site URL from localhost:3000 to your actual site domain. Then click Save Changes.
Then open your email and verify your user. Here you can see we received a confirm your signup email from Supabase Auth, so we'll click the link to confirm the user, and there you go, the app loads in our browser.
But you'll notice one thing, the user sign in and sign out buttons aren't there, and that's because the published version of our site does not include the changes that we just made in Hostinger Horizons. So let's close out this tab and return to Hostinger Horizons. Then go ahead and click publish.
And if we click to view our site, we'll see that the live version now has user management. So let's go ahead and sign in. So now we're logged into the site and you can see that instead of a sign in and sign up button, we have a sign out button, so everything's working as intended, but you can see there's still no functionality for users to retrieve the past invoices they've created. So let's add that next.
Adding Invoice Management
I've said add a page to the app where users can view all of the invoices that they've created and change the status of them once the customer has paid. I'll hit Send.
Now, here we got a web app error detected dialogue. This happens sometimes, maybe the code doesn't render right, so you can simply click the Ask to Fix button and Hostinger Horizons will handle the rest.
And there we go. We can see that the new version of the app has loaded. It moved the Download button, which I wasn't expecting, but that's okay. It actually looks better there.
So let's go ahead and sign into the app in the top right and then see what kind of features it created for logged in users. You can see now that we're logged in, there's a button at the top right that appears that says My Invoices.
Let's click that and here we can see the invoice drafts, we can change the status of them, and we can even go to create a new invoice up top right. Great.
Now that we have all our user data features integrated, let's go ahead and publish the newest version of the app. Voila, a fully functioning web app.
Next Steps: Growing The Web App
With authentication and database integration complete, you've crossed a major milestone. You have an MVP, a minimum viable product, that delivers real value and is ready to make some money. So what's next?
Now that your web app is live, you need people to find it. SEO helps your site rank higher in Google when people search for tools like yours. In the case of our demo, people search for free invoice generator thousands of times monthly. The right keywords get you in front of those searches.
Use tools like Semrush to find keywords with decent search volume, but low competition. Once you have your keywords, simply give them to Hostinger Horizons and tell it to optimize your site's SEO using those keywords.
Scaling Beyond AI Limitations
Speaking of Hostinger Horizons' capabilities, while it's perfect for building and optimizing simple tools like this, you might eventually want to scale beyond what the AI can handle. If you decide to add more complex features down the road, you can export your code by clicking the hamburger menu and selecting export code. This gives you or a developer full access to expand the app beyond what the AI can build.
If you've been watching along but haven't actually built your own app yet, now is the perfect time to jump in. Use our special link in the description to get an additional 10% off Hostinger Horizons and start building your web app.